Troubleshooting Azure AD B2B Guest Sign In User Does Not Exist In Tenant Errors AADSTS50020, AADSTS500211, AADSTS50034, AADSTS90072 etc.

You are here because you have invited an external user to your Entra (formerly Azure AD) tenant via B2B Guest invitations and when signing in to your tenant the external user receives an error such as the following:

“User account ‘{_email}’ from identity provider ‘{idp}’ does not exist in tenant ‘{tenant}’ and cannot access the application ‘{appId}'({appName}) in that tenant. The account needs to be added as an external user in the tenant first. Sign out and sign in again with a different Azure Active Directory user account.”

This error comes in various forms of error codes such as any of the following:

AADSTS16003
AADSTS50020
AADSTS500211
AADSTS50034
AADSTS50177
AADSTS50178
AADSTS51004
AADSTS90072

However, they all mean essentially the same thing. The user who has signed into their own tenant (identified by the “from identity provider X” section of the error) succesfully, is trying to access a resource tenant (identified by the “does not exist in tenant Y” section of the error) and AAD cannot find any Guest user object in tenant Y with a matching proxyAddress.

Troubleshooting Steps

  1. Verify that a user object exists in the resource tenant matching the user name from the error message and note whether Invitation State = Pending Acceptance or Accepted . If invite is already Accepted, go to step 8.
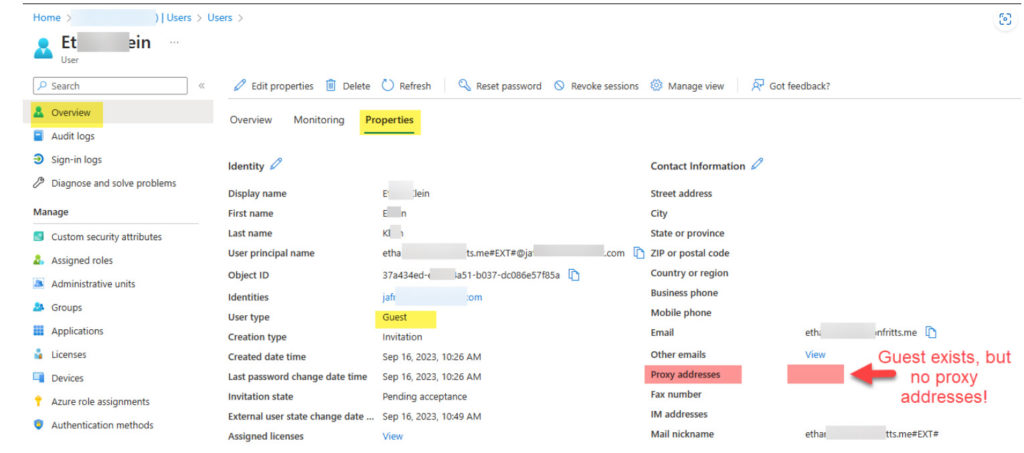
  2. Verify that on the Guest user object found in the resource tenant, that the username from the error message exists as a ProxyAddress smtp:user@contoso.com
  3. If no user is found in resource tenant, then the user must be invited  first
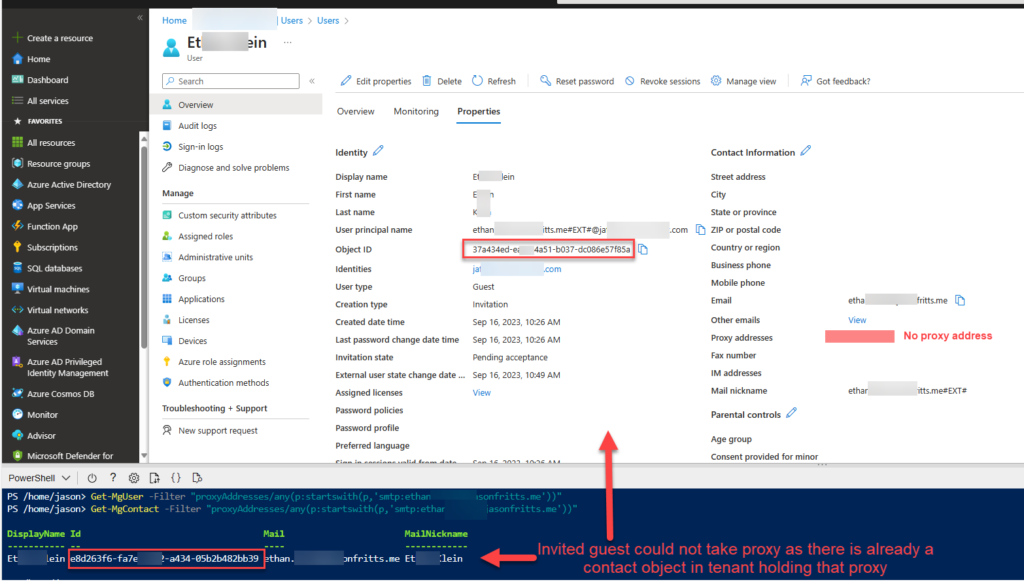
  4. If a user is found, but they have no ProxyAddress attribute matching the invited guest, then when the user was invited there may have been a duplicate proxyAddress error. See the following public docs on scenario.
Example of a Azure AD B2B guest user who has no ProxyAddress due to conflict with existing contact object
  1. To locate the duplicate proxyAddress in the directory, the admin can query the tenant using Graph Powershell Module
 # Define the proxyAddress to search for
 $proxyAddress = "user@contoso.com"
 
 # Get all users and contacts from the Microsoft Graph API
 Get-MgUser -Filter "proxyAddresses/any(p:startswith(p,`'smtp:$proxyAddress`'))"
 Get-MgContact -Filter "proxyAddresses/any(p:startswith(p,`'smtp:$proxyAddress`'))"

Example of how to use Graph Powershell to find User or Contact object containing proxyAddress

  1. Once the object holding the user’s proxyAddress is located, the administrator can delete this user and then reinvite the Guest user to populate the proxyAddress

Using resend invite to populate ProxyAddress value \ Send direct redemption link

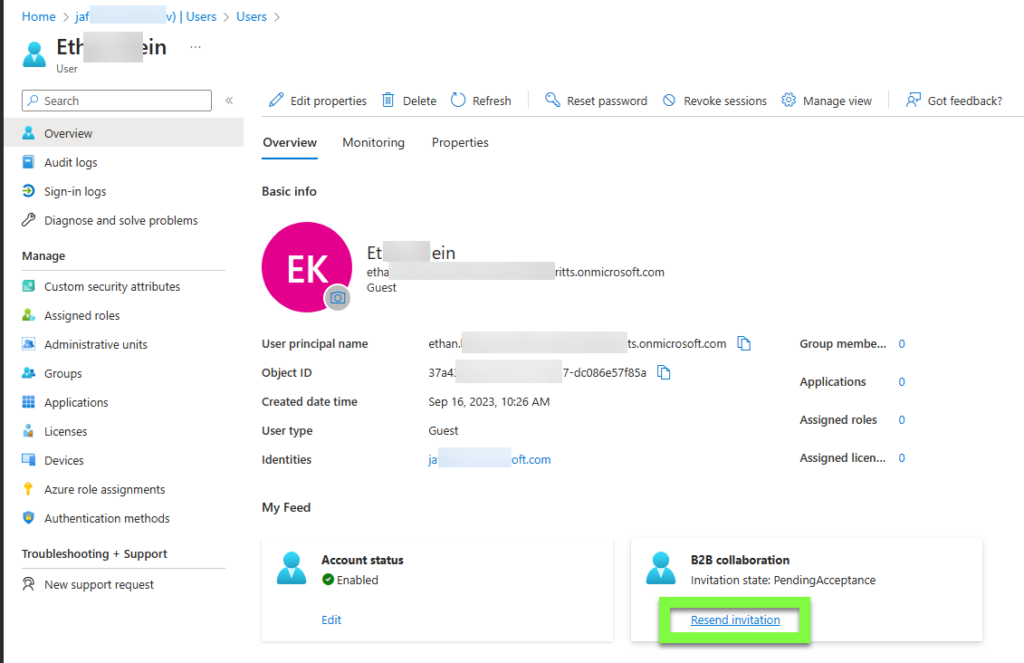
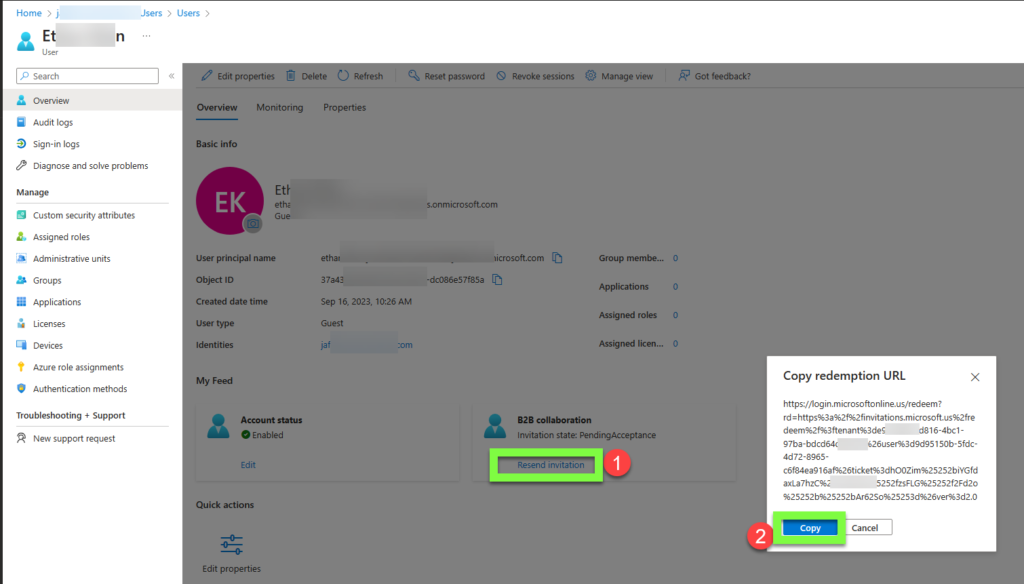
  1. Alternatively, the administrator can send the user a direct redemption link via the Resend invitation or asking user to click the Accept invitation link found in invitation email. These links (starting with https://login.microsoftonline.com/redeem ) are direct invite redemption links  and will not require lookup of proxyAddress in resource tenant.
Copying direct redemption link from resend invite function UX
Invite email also has direct redemption link via “Accept invitaiton” link target
  1. If the guest user does exist AND has a matching proxyAddress but the error still persists, then the guest invitation may have already been accepted (Invite state = Accepted) by a user whose home account PUID \ ObjectID has since changed. Usually the user’s home object ID has changed after being recreated since originally accepting invite.

    In this scenario, resource tenant admin will need to reset redemption state  on the guest user so the external user can accept the invite again. See Check whether guest alternative security id differs from the home tenants net ID


PS. You can find some additional troubleshooting steps in the public doc for Error AADSTS50020 – User account from identity provider does not exist in tenant article

Thanks for reading and hope it helps someone troubleshoot their B2B sign in failure!

Azure AD and GSuite Federation Scenarios

The following are some notes on the different types of federation that can be configured between Azure AD and GSuite.

Scenario 1 – Configure GSuite SAML IDP Federation into Azure AD

Configure your corporate GSuite as your primary IDP and configure SAML SSO to Azure AD\Office 365 (Gsuite users are autoprovisioned into AAD, or mapped via Immutable ID) and then your users can sign in to your Azure AD tenant with GSuite credentials.  Your Gsuite domain name is added as a federated domain in your AAD tenant.  Your user management is primarily done from Gsuite.

Scenario:

  • Service Provider: AAD
  • Identity Provider: GSuite
  • User Provisioning: Users are created in GSuite, and then provisioned into AAD


Docs\Steps:


Notes:

  • This scenario supports GSuite IDP initiated SAML SSO to Azure AD. You must however provision user accounts into Azure AD from GSuite with matching immutable IDs
  • This scenario is for enabling SSO for your own corporate Gsutie users to your own Azure AD tenant,  it is NOT for inviting external GSuite users to your Azure AD tenant as guests.

Scenario 2 – Configure Azure AD SAML SSO to GSuite

Use Azure AD as your primary IDP and configure SAML SSO to allow your Azure AD users to SSO login to GSuite with Azure AD credentials.  Azure AD SCIM Provisioning, configures GSuite users.  Your Azure AD domain is added as a federated domain in your GSuite workspace. 

Scenario:

  • Service Provider: GSuite
  • Identity Provider: AAD
  • User Provisioning: Users are created in AAD, and then provisioned into GSuite via SCIM


Docs\Steps: 

Scenario 3 – Federation with SAML/WS-Fed identity providers for guest users

If you need to share or collaborate content or applications in your own Azure AD tenant with external users, you would need to invite these users using Azure AD B2B.  If the user’s you need to invite do not have their own Azure AD tenant, but do use GSuite as their identity provider. You can configure External Identities SAML Federation with their GSuite domain.  When you invite their GSuite email accounts they will now be able to accept your guest invitations and authenticate to your AAD tenant as Guest users using their GSuite credentials.

Scenario:

  • Service Provider: AAD
  • Identity Provider: Gsuite for initial Guest authentication
  • User Provisioning: Your partner\customer has users in GSuite already provisioned. You invite these users into AAD via B2B guest invitations. They authenticate via GSuite and sign into your AAD tenant as a Guest

Docs\Steps:


Notes:

  • This scenario does not support GSuite IDP initiated SAML SSO to Azure AD.  You must invite the external GSuite IDP users to your Azure AD tenant as B2B Guests and then those users must access your Azure AD tenant using a tenanted URL  ie.   https://portal.azure.com/mytenant.com after which they will be redirected to GSuite to sign in with GSuite credentials and then signed into your Azure AD tenant as Guest users.

Elevating to the Azure AD Joined Device Local Administrator Role with Privileged Identity Management (PIM)

After troubleshooting a number of cases on issues elevating to the Azure AD Joined Device Local Administrator Role with Privileged Identity Management (PIM), I want to explain how to immediately utilize this role on a AAD Joined Device so you can utilize the Local Administrator role on that device.

The number one reason you may not have Local Administrator privileges after elevating to this role using PIM is that you are still using a cached Primary Refresh Token (PRT) on the local device. If you have an active PRT (check with command prompt -> dsregcmd /status ) that was issued prior to your PIM elevation (check the AzureAdPrtUpdateTime attribute) , then you won’t see the benefits of your newly elevated role until that PRT cache expires. Which as per How is a PRT renewed? is only every 4 hours

The requirement to utilize your newly elevated role is to obtain a new Primary Refresh Token (PRT). So if you don’t want to wait for 4 hours to have your PRT refreshed, here are the steps to ensure you obtain a new PRT and immediately receive Local Administrator privileges on your AAD Joined Device.

Elevation Steps

  1. Using Privlieged Identity Management, activate your eligible Azure AD Joined Device Local Administrator Role.
  2. Browse to PIM blade -> My roles and verify this role shows up under the Active assignments tab:
PIM -> My Roles -> Active Assignments
  1. Additionally, browse to PIM -> My audit history -> And note the exact timestamp of the time your “Add member to role completed (PIM activation)” activity occured.
PIM -> My Audit History -> Add member to role completed (PIM activation) timestamp
  1. Now you can login to your Windows client machine and check to see if you have Local Administrator permissions or not. To do this, open a Windows Command Prompt (start -> run -> cmd) and run the cmd whoami /all check if you show as a member of the BUILTIN\Administrators group or not under Group Information. In this example, as I am using a cached PRT obtained prior to PIM elevation, I am NOT showing as a Local Administrator
Command Prompt -> whoami /all -> no listing for BUILTIN\Administrators
  1. Since I need a fresh PRT to see my new role, I will run the command dsregcmd /refreshprt , this command will schedule a refresh of my PRT.
Command Prompt -> dsregcmd /refreshprt
  1. After running this command, I suggest waiting for ~ 1-2 minutes to allow the refresh to occur.
  2. After waiting 1-2 minutes, Logout of your Windows session.
  3. Now, Log back in to your Windows session to utilize your new PRT
  4. Check again if you now have Local Administrator permissions by running whoami /all and locating the new entry for the BUILTIN\Administrators group.
Command Prompt -> whoami /all -> BUILTIN\Administrators now listed

Hope this helps someone!

User does not have access Microsoft.Subscription/aliases/read over scope

The error “User does not have access Microsoft.Subscription/aliases/read over scope providers/Microsoft.Subscription/aliases/X ” can be fixed using these steps:

  1. First determine who the user or principal trying to read Microsoft.Subscription/aliases is.
  2. Next as an Azure AD Global Administrator run Azure Resource Elevation process ( https://docs.microsoft.com/en-us/azure/role-based-access-control/elevate-access-global-admin#azure-portal) so you have “User Access Administrator” permissions at the “/” scope
  3. Finally, using Azure PowerShell or Azure CLI cmds, add the user or principal referenced in the error to the Reader role at the root “/” scope as shown below.
# Azure PowerShell Example:
New-AzRoleAssignment -ObjectId 1bc23456-2456-4a8a-8b9a-c327f407d41e -Scope / -RoleDefinitionName "Reader"
# Azure CLI Example:
az role assignment create --role Reader --assignee 1bc23456-2456-4a8a-8b9a-c327f407d41e --scope /

NOTE: In the above example “1bc23456-2456-4a8a-8b9a-c327f407d41e” is the Azure AD Object ID of the user or service principal who received the error. Find this value with Get-AzAdUser / Get-AzAdServiceprincipal or az ad user / az ad sp cmds.

How to create an Azure AD B2C support case with Azure Support diagnostic consent.

To grant an Azure AD B2C support engineer proper consent to your Azure AD B2C tenant diagnostic logs, please follow the below steps.

Note:
These steps must be followed by a user who has a valid Guest\External account access to your Azure AD B2C tenant. Meaning, you can use the Azure Portal’s directory switcher to switch between your standard Azure AD tenant and login to your Azure AD B2C tenant. This user should also have administrative permissions in the Azure AD B2C tenant.

Steps

  1. First from your standard Azure AD tenant, open a new support case via Azure Portal’s support blade at https://aka.ms/azuresupportrequest
  2. Chose the following options
    • Issue Type = Technical
    • Subscription = <Select the Azure Billing Subscription for your Azure AD B2C tenant>
    • Service = All Services
    • Service Type = Azure Active Directory Business To Consumer (B2C)

Example:

Example
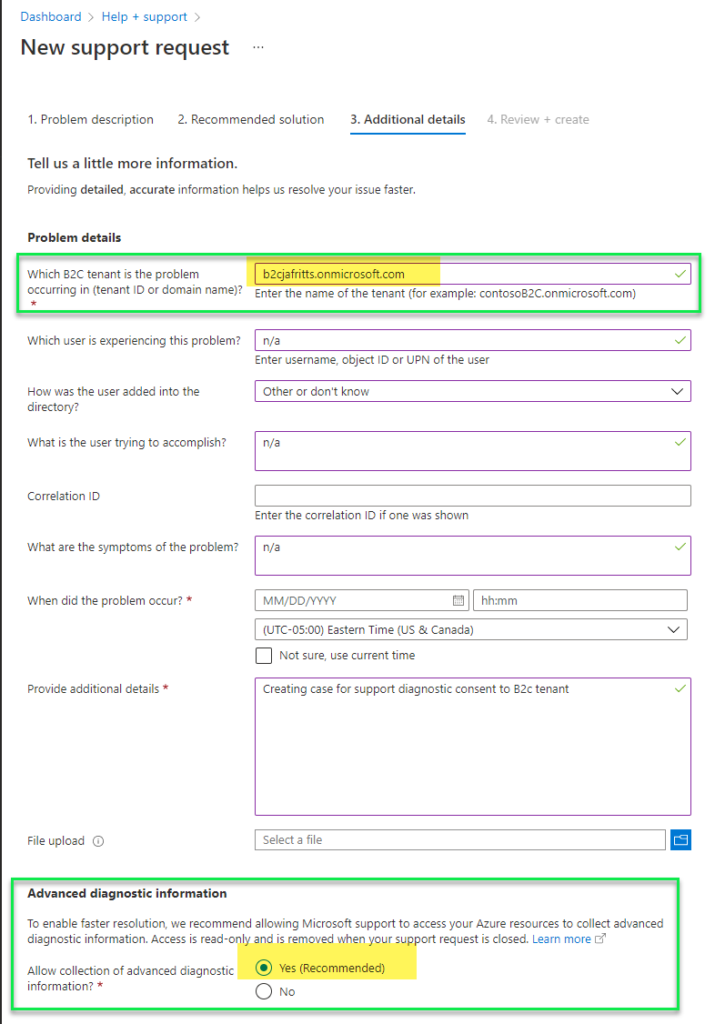
  1. On the next blade, be sure to fill out the following options:
    • Which B2C tenant is the problem occurring in? = Fill out the b2ctenant.onmicrosoft.com or tenant ID of your B2C TENANT
    • Advanced diagnostic information = Yes , so Azure support engineer has permissions for the life of the support case to access your B2C tenant diagnostic logs.

Example:

  1. At this point you can submit the case, and then share your case # with your Azure AD B2C support engineer so they can use it to review B2C diagnostic logs.

Why is Azure AD Password Reset (SSPR) Setting the “User must change password at next logon” flag after password writeback?

If you have password writeback enabled and a user performs self service password reset (SSPR), the user’s new password should be written back to on-premise AD as a non-expired password. That is, after the password is written back to on-premise attribute PwdLastSet should be updated with the timestamp of the password reset:

PwdLastSet attribute containing timestamp.

Additionally, the on-prem AD user’s account option flags should not have “User must change password at next logon” flag set:

User must change password at next logon flag not set.

These two factors would indicate the user’s password is not a temporary password that expires but a permanent one as expected.

Why would “User must change password at next logon” flag be enabled after password writeback?

If instead, the above to factors are not true, then something went wrong with the password writeback operation and the password will be considered temporary\expired. This will mean the end user will have to change their password during the next logon to an on-premise AD joined resource. This is not expected behavior.

No PwdLasetSet attribute defined, indicating temporary\expired password
User must change password at next logon flag is set

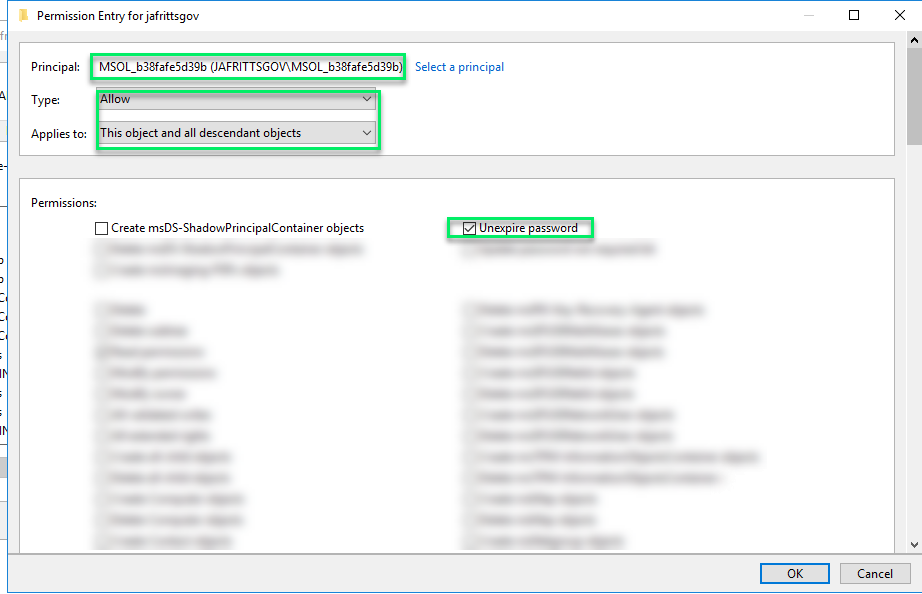
The most common reason is that the Azure AD Connect on-premise AD service account (typically MSOL_b38random9b@domain.com does not have sufficient permissions on the domain to perform “Unexpire password” operation

Most default Windows AD domains will have this permission granted to at the root domain level to all “Authenticated Users” and so MSOL service account will have this permission as well :

Unexpire password permission for Authenticated Users at domain root

However, I have seen a number of scenarios where for security reasons this permission might not be granted to all users. If this is the case, you will want to ensure you grant the MSOL service account this permission manually to root domain and all descendant objects:

Manually add Unexpire password permission for MSOL service account at root domain level and all descendant objects

Once this is applied, you should be able to have the user reset their password via SSPR and the password writeback operation will not set the “User must change password at next logon” flag as it will set the PwdLastSet timestamp succesfully.

Note if there are any other permission related errors, follow the Enable password writeback to on-premises \ Configure account permission for Azure AD Connect public doc for all of the permissions required.

Another quick note that has caused some confusion…

If instead of the end user performing SSPR from https://aka.ms/sspr the AAD admin is resetting the user’s password on the user’s behalf from the Azure AD portal -> User Profile -> Reset Password link.

Admin initiated password reset

Then it is by design \ expected for the on-premise “User must change password at next logon” flag to be selected during the password writeback operation. This is because admin initiated password reset only sets a temporary password not a permanent one.

This fact is explained in https://docs.microsoft.com/en-us/azure/active-directory/fundamentals/active-directory-users-reset-password-azure-portal#to-reset-a-password but is also mentioned in the Azure AD portal’s dialog during the reset password operation

Automating Azure Privileged Identity Management (PIM) with PowerShell

On a recent support case we had a customer who was trying to automate Privileged Identity Management (PIM) role assignments for Azure Resources with PowerShell. We could not find any public end to end documentation on the syntax to make this work. After some trial and error we found the following syntax works.

NOTE: PIM can assign both Azure AD roles and Azure resource roles so both scenarios are shown below. Additionally, make sure you have the latest version of AzureADPreview module installed.

Assigning Azure AD roles

For this scenario there is a public doc explaining the syntax which can be found at PowerShell for Azure AD roles in Privileged Identity Management . For roleDefinitionID you can also look these IDs up on Azure AD built-in roles doc

PowerShell code example:

### Azure AD PIM Example
Connect-AzureAD

$tenantID = "91ceb514-5ead-468c-a6ae-048e103d57f0"
$roleDisplayName = "Global Administrator"
$roleDefinitionID = (Get-AzureADMSRoleDefinition -Filter "DisplayName eq '$roleDisplayName'").Id
$targetuserID = (Get-AzureADUser -ObjectId User.Name@jasonfritts.me).ObjectId  # Replace user ID

$schedule = New-Object Microsoft.Open.MSGraph.Model.AzureADMSPrivilegedSchedule
$schedule.Type = "Once"
$schedule.StartDateTime = (Get-Date).ToUniversalTime().ToString("yyyy-MM-ddTHH:mm:ss.fffZ")
$schedule.EndDateTime =  ((Get-Date).AddDays(1)).ToUniversalTime().ToString("yyyy-MM-ddTHH:mm:ss.fffZ")

# Create temporary eligible role assignment
Open-AzureADMSPrivilegedRoleAssignmentRequest -ProviderId 'aadRoles' -ResourceId $tenantID -RoleDefinitionId $roleDefinitionID -SubjectId $targetuserID -Type 'adminAdd' -AssignmentState 'Eligible' -schedule $schedule -reason "testing"

# Create temporary active role assignment
Open-AzureADMSPrivilegedRoleAssignmentRequest -ProviderId 'aadRoles' -ResourceId $tenantID -RoleDefinitionId $roleDefinitionID -SubjectId $targetuserID -Type 'adminAdd' -AssignmentState 'Active' -schedule $schedule -reason "testing"


Assigning Azure Resource Roles

For Azure Resource roles I could not find any end to end public doc examples but after trial and error the below steps were confirmed to work.

NOTE: The additional cmds compared to Azure AD role scenario are to convert ARM subscription IDs and ARM role IDs into their PIM resource IDs. For roleDefinitionID you can also look up built-in role IDs on Azure built-in roles doc if you are using custom roles, you can look these up in Azure Portal -> Subscription blade -> Access Control -> Roles

PowerShell code example:

## Azure Resource PIM Example
Connect-AzureAD

$subscriptionID = "ed6a63cc-c71c-4bfa-8bf7-c1510b559c72"
$roleDefinitionID = "b24988ac-6180-42a0-ab88-20f7382dd24c" #Built-in Contributor Role Definition ID example
$targetuserID = (Get-AzureADUser -ObjectId User.Name@jasonfritts.me).ObjectId  # Replace user ID


# Convert IDs to PIM IDs
$SubscriptionPIMID = (Get-AzureADMSPrivilegedResource -ProviderId 'AzureResources' -Filter "ExternalId eq '/subscriptions/$subscriptionID'").Id
$RoleDefinitionPIMID = (Get-AzureADMSPrivilegedRoleDefinition -ProviderId 'AzureResources' -Filter "ExternalId eq '/subscriptions/$subscriptionID/providers/Microsoft.Authorization/roleDefinitions/$roleDefinitionID'" -ResourceId $subscriptionPIMID).Id


$schedule = New-Object Microsoft.Open.MSGraph.Model.AzureADMSPrivilegedSchedule
$schedule.Type = "Once"
$schedule.StartDateTime = (Get-Date).ToUniversalTime().ToString("yyyy-MM-ddTHH:mm:ss.fffZ")
$schedule.EndDateTime =  ((Get-Date).AddDays(1)).ToUniversalTime().ToString("yyyy-MM-ddTHH:mm:ss.fffZ")

# Create temporary eligible role assignment
Open-AzureADMSPrivilegedRoleAssignmentRequest -ProviderId 'AzureResources' -ResourceId $SubscriptionPIMID -RoleDefinitionId $RoleDefinitionPIMID -SubjectId $targetuserID -Type 'adminAdd' -AssignmentState 'Eligible' -schedule $schedule -reason "testing"

# Create temporary active role assignment
Open-AzureADMSPrivilegedRoleAssignmentRequest -ProviderId 'AzureResources' -ResourceId $SubscriptionPIMID -RoleDefinitionId $RoleDefinitionPIMID -SubjectId $targetuserID -Type 'adminAdd' -AssignmentState 'Active' -schedule $schedule -reason "testing"

Extend AAD Service Principal Client Secret Expiration

Occasionally you may be alerted to an existing Azure AD service principal whose client secret is scheduled to expire soon. From the Azure AD portal -> Application Registrations -> App -> Certificates & Secrets blade it is not possible to extend the expiration of an existing secret. You can only create a new one.

This can be a problem because the portal auto-generates the secret to be a random value. So you would have to go and update all your application code\configs to use this new secret value.

Luckily, with Azure PowerShell module you can both create a new secret with the same value as your existing one and set it’s expiration date manually preventing any unnecessary work to update application code\configs.

Example Script:


# Get service principal
$sp = Get-AzADServicePrincipal -DisplayName "MyTestApp"

# View current password Ids and expirations
Get-AzADSpCredential -ObjectId $sp.Id

#choose expiration date
$start = get-date
$end = $start.AddYears(150)

#Set same password as current password
$SecureStringPassword = ConvertTo-SecureString -String "c0[Ndh_@G/j8tB4aqbq66R]P*0MVwB.h" -AsPlainText -Force
New-AzADAppCredential -ApplicationId $sp.ApplicationId -StartDate $start -EndDate $end -Password $SecureStringPassword

# Verify new credential expiration
Get-AzADAppCredential -ApplicationId $sp.ApplicationId

Remote Desktop Licensing on Azure AD Domain Services

I have seen a few questions regarding if Azure AD Domain Services supports Remote Desktop Services (RDS) licensing services.

These questions mostly are around whether or not Per User license auditing reports are supported as this requires AD user attribute updates when the RD Licensing Server issues a per user CAL to the user. In Azure AD Domain Services user writes are only allowed from Azure AD itself, not within Azure AD Domain Services (where the user objects are read only).

This process IS supported as long as the administrator installing the Remote Desktop Licensing server role on the Windows Server host is a member of the Azure AD group “AAD DC Administrators” when they are installing the Remote Desktop Licensing server role. You can verify membership from within your AAD DS joined workstation with cmd:

whoami /groups

Once you have verified membership in “AAD DC Administrators”, after installation of the Remote Desktop Licensing role, you should find that the server’s Windows AD computer object has been added to the “Terminal Server License Servers” security group as shown below:

If this is not the case, verify that the security permissions on the “Terminal server License Servers” group show that the “AAD DC Administrators” group has the effective permission “Write Members” as shown below:

And on a user within AADDC Users OU, view security effective permissions for the Terminal Service License Servers group and verify it has read\write permissions on the following msTS user attributes shown below:

If you do not see this ACL entry for Terminal Server License servers, you should open a support case as this would be unexpected behavior. If the Remote Desktop Licensing Server computer object is not a member of the “Terminal Server License Server” group then you may find the following error in your Event Logs:

Log Name: System
Source: Microsoft-Windows-TerminalServices-Licensing
Event ID : 4105
Level: Warning
User: N/A
Computer: <computer name>
Description:
The Terminal Services license server cannot update the license attributes for user <user name> in the Active Directory Domain <domain name>. Ensure that the computer account for the license server is a member of Terminal Server License Servers group in Active Directory domain <domain name>.
If the license server is installed on a domain controller, the Network Service account also needs to be a member of the Terminal Server License Servers group.
If the license server is installed on a domain controller, after you have added the appropriate accounts to the Terminal Server License Servers group, you must restart the Terminal Services Licensing service to track or report the usage of TS Per User CALs.
Win32 error code: 0x80070005

Once computer membership in Terminal Server License Servers group has been confirmed, you should find no issues tracking Per-user CAL issuance in RD Licensing Manager:

Viewing any user’s AD attributes after they were issued a per user CAL should show that the necessary license tracking has been successfully written to the user in Azure AD Domain Services:

A Per-user CAL license report should also successfully list these users:

I hope this clears up any questions around the compatibility

What is “Microsoft Approval Management” and why is it making changes to my AAD objects?

Occasionally we receive support cases from customers performing audits of their Azure AD Audit or Sign in logs and do not know what the service principal \ actor ” Microsoft Approval Management “ is.

After review with Microsoft product engineering teams it was confirmed this is a 1st Party Microsoft Service Principal for the following services and may be logged in customer audit logs during the operation of any of these services in your tenant.

  1. Dynamic Groups
  2. Self Service Group Management
  3. O365 Group Expiration policy

Any of the operations performed by these services such as calculating group memberships, applying group memberships, performing group expirations etc.  will be logged in Azure AD audit logs as being performed by “Microsoft Approval Management”.  All of the operations performed by these services, are documented in the links above.

You can confirm this service principal is in your AAD tenant with the AzureADPreview PowerShell module and the following cmd

Get-AzureADServicePrincipal -Filter "DisplayName eq 'Microsoft Approval Management'" | fl *

Where you should confirm that the PublisherName = “Microsoft Services” and you may find it listed with the AppID of “65d91a3d-ab74-42e6-8a2f-0add61688c74” or “38049638-cc2c-4cde-abe4-4479d721ed44”

UPDATE:

If this service principal is disabled you may experience strange behavior in the Azure AD Portal when trying to manage groups.

One example, if this service principal has been disabled by the AAD Global Administrator any operation on groups in the AAD portal may return an error : “Unable to complete due to service connection error. Please try again later”

Portal error : Unable to complete due to service connection error. Please try again later.

If you receive this error, verify that the Microsoft Approval Management enterprise application has not been disabled.

  1. Go to AAD -> Enterprise Apps blade : Enterprise applications – Microsoft Azure
  2. Then browse to All applications Set filters to Application type = All Applications, Status = Any, Application Visibility = Any In search box type the appID 65d91a3d-ab74-42e6-8a2f-0add61688c74

3. Open this app’s properties Choose Enabled for users to sign in = Yes Hit Save

4. Then retry their group operation which failed

NOTE: You may also want to check for app ID 38049638-cc2c-4cde-abe4-4479d721ed44 to verify it is enabled as well.

UPDATE:
If you have other unknown principals showing up in your AAD logs and you would like to verify they are Microsoft 1st party principals please use the Feedback sections of the below articles

Unknown Actors in AAD Audit Reports
Verify first-party Microsoft applications in sign-in reports